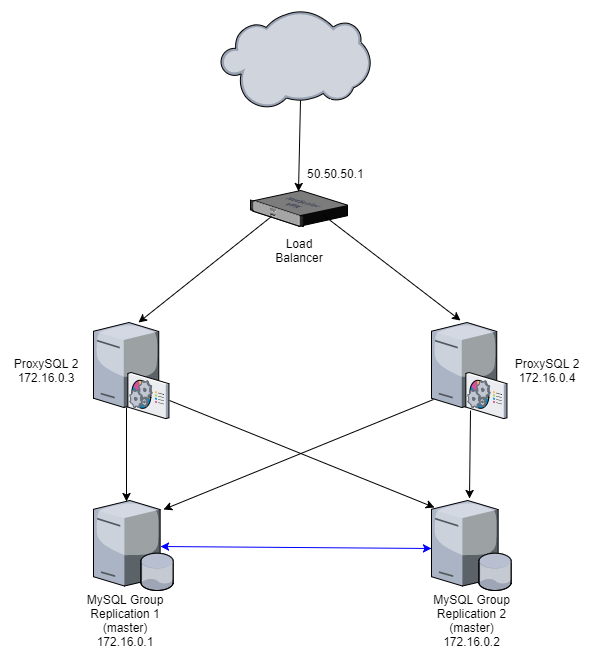
We use 1 Load Balancer, 2 ProxySQLs, and 2 MySQL Group Replications. We use load balancer as a gateway to system and to avoid single point of failure for ProxySQL.
Test to access the user and database using load balancer Public IP address (eg: 50.50.50.1). If we use shell to access mysql use this command: mysql -u sbuser -psbpassword -h 50.50.50.1 -P 6033
Setting environment for using XAMPP for Windows. user@DESKTOP-P20ELHV d:\xampp # mysql -u sbuser -psbpassword -h 50.50.50.1 -P 6033 Welcome to the MariaDB monitor. Commands end with ; or \g. Your MySQL connection id is 367836 Server version: 5.5.30 (ProxySQL)
Copyright (c) 2000, 2017, Oracle, MariaDB Corporation Ab and others.
Type 'help;' or '\h'forhelp. Type '\c' to clear the current input statement.
MySQL [(none)]> select * from playground.equipment; +----+-------+-------+--------+ | id | type | quant | color | +----+-------+-------+--------+ | 1 | slide | 2 | blue | | 2 | swing | 10 | yellow | | 9 | slide | 3 | green | | 15 | pen | 5 | purple | | 16 | watch | 6 | black | +----+-------+-------+--------+ 5 rows inset (0.06 sec)
MySQL [(none)]>
2. One of ProxySQL Node is Down
Stop proxySQL service in one node.
1
root@proxysqlnode1:~# service proxysql stop
Test to access the user and database using load balancer Public IP address.
3. One of MySQL Group Replication Node is Down
Stop mysql service in one of MySQL Group Replication node.
1
root@mysql1:~# systemctl stop mysql.service
Test to access the user and database using load balancer Public IP address.
We use 2 ProxySQLs to single point of failure of ProxySQL. We need to set up load balancer as the gateway and share the traffict for both of ProxySQLS.
When you are in Add Listener pop up. Follow this note:
Frontend Protocol [Port] : 6033. To make it simple you can use port 6033 (same with ProxySQL port)
Backend Protocol [Port] : 6033. It must same with ProxySQL port, because we want to access this port
Scheduling Algorithm : Round Robin
Health Check Port : 6033
After you add the listener, you need to add Backend Servers. Add the both of ProxySQL instance to the Backend Servers. Go back to the Instances page and click Refresh. When health check is Normal, the corresponding ECS instance can process requests forwarded by the Server Load Balancer instance normally.
Check and Test
Test to access the database using the load balancer IP address (50.50.50.1). If you use mysql shell, use this command: mysql -u sbuser -psbpassword -h 50.50.50.1 -P 6033
Setting environment for using XAMPP for Windows. user@DESKTOP-P20ELHV d:\xampp # mysql -u sbuser -psbpassword -h 50.50.50.1 -P 6033 Welcome to the MariaDB monitor. Commands end with ; or \g. Your MySQL connection id is 367836 Server version: 5.5.30 (ProxySQL)
Copyright (c) 2000, 2017, Oracle, MariaDB Corporation Ab and others.
Type 'help;' or '\h'forhelp. Type '\c' to clear the current input statement.
MySQL [(none)]> select * from playground.equipment; +----+-------+-------+--------+ | id | type | quant | color | +----+-------+-------+--------+ | 1 | slide | 2 | blue | | 2 | swing | 10 | yellow | | 9 | slide | 3 | green | | 15 | pen | 5 | purple | | 16 | watch | 6 | black | +----+-------+-------+--------+ 5 rows inset (0.06 sec)
We use ProxySQL as a gateway to access MySQL Group Replication nodes. ProxySQL is a high-performance SQL proxy. ProxySQL runs as a daemon watched by a monitoring process. The process monitors the daemon and restarts it in case of a crash to minimize downtime. The daemon accepts incoming traffic from MySQL clients and forwards it to backend MySQL servers.
Node Configuration
Node
IP Private
Description
Node 1
172.16.0.1
MySQL 1 (Master)
Node 2
172.16.0.2
MySQL 2 (Master)
Node 3
172.16.0.3
ProxySQL
1. Install MySQL Client/Server and Open Up The Port in ProxySQL Node
Install MySQL Client/Server if you do not have it in ProxySQL node yet. You can see this post: Install-mysql-in-Ubuntu-16.04
root@proxysqlnode:/download# mysql -u admin -padmin -h 127.0.0.1 -P6032 --prompt='Admin> ' mysql: [Warning] Using a password on the command line interface can be insecure. Welcome to the MySQL monitor. Commands end with ; or \g. Your MySQL connection id is 1 Server version: 5.5.30 (ProxySQL Admin Module)
Copyright (c) 2000, 2017, Oracle and/or its affiliates. All rights reserved.
Oracle is a registered trademark of Oracle Corporation and/or its affiliates. Other names may be trademarks of their respective owners.
Type 'help;' or '\h'forhelp. Type '\c' to clear the current input statement.
To enable monitoring of group replication nodes in ProxySQL, create a user with USAGE privilege on any node in the cluster and configure the user in ProxySQL. We only need to create in 1 node because it will be replicated in another node automatically once the group replication runs.
Add a monitoring user on Node 1:
1 2
mysql> CREATE USER 'proxysql'@'%' IDENTIFIED BY 'ProxySQLPassword'; mysql> GRANT USAGE ON *.* TO 'proxysql'@'%';
Add a monitoring user on ProxySQL:
1 2
mysql> CREATE USER 'proxysql'@'%' IDENTIFIED BY 'ProxySQLPassword'; mysql> GRANT USAGE ON *.* TO 'proxysql'@'%';
Configure the monitoring user in ProxySQL. Use LOAD command to load this configuration at runtime. Use SAVE to save these changes to disk so they can persist after ProxySQL is shutdown.
1 2 3 4
Admin> UPDATE global_variables SET variable_value='proxysql' WHERE variable_name='mysql-monitor_username'; Admin> UPDATE global_variables SET variable_value='ProxySQLPassword' WHERE variable_name='mysql-monitor_password'; Admin> LOAD MYSQL VARIABLES TO RUNTIME; Admin> SAVE MYSQL VARIABLES TO DISK;
Check the monitoring logs to ensure that monitoring is enabled:
Admin> LOAD MYSQL USERS TO RUNTIME; Admin> SAVE MYSQL USERS TO DISK;
In MySQL group replication Node 1, grant permission for sbuser for ProxySQL host (172.16.0.3). You only do this in one MySQL group replication node because it will be replicated.
1 2 3 4 5 6 7 8 9 10 11 12 13 14
mysql> CREATE USER 'sbuser'@'172.16.0.3' IDENTIFIED BY 'sbpassword'; mysql> GRANT ALL ON playground.* TO 'sbuser'@'172.16.0.3'; mysql> SELECT User,Host FROM mysql.user; +---------------+----------------+ | User | Host | +---------------+----------------+ | proxysql | % | | repl | % | | sbuser | 172.16.0.3 | | mysql.session | localhost | | mysql.sys | localhost | | root | localhost | +---------------+----------------+ 6 rows inset (0.00 sec)
In ProxySQL Node, try to login with the new user to check if the user has been set up correctly:
1
2
3
4
5
6
7
8
9
10
11
12
13
14
15
root@proxysqlnode:~# mysql -u sbuser -psbpassword -h 127.0.0.1 -P 6033 mysql: [Warning] Using a password on the command line interface can be insecure. Welcome to the MySQL monitor. Commands end with ; or \g. Your MySQL connection id is 366392 Server version: 5.5.30 (ProxySQL)
Copyright (c) 2000, 2017, Oracle and/or its affiliates. All rights reserved.
Oracle is a registered trademark of Oracle Corporation and/or its affiliates. Other names may be trademarks of their respective owners.
Type 'help;' or '\h'forhelp. Type '\c' to clear the current input statement.
mysql>
8. Add a Scheduler to Verify MySQL InnoDB Cluster (Group Replication) - Optional
Still in ProxySQL node, now we will add a scheduler that will use a script that verifies our MySQL InnoDB Cluster (Group Replication). The script is available on https://github.com/lefred/proxysql_groupreplication_checker. Download the sh file and you can put it in “/var/lib/proxysql/“. Insert, save and load the scheduler.
1 2 3
Admin> INSERT INTO scheduler(id,interval_ms,filename,arg1,arg2,arg3,arg4, arg5) VALUES (1,'10000','/var/lib/proxysql/proxysql_groupreplication_checker.sh','1','2','1','0','/var/lib/proxysql/proxysql_groupreplication_checker.log'); Admin> SAVE SCHEDULER TO DISK; Admin> LOAD SCHEDULER TO RUNTIME;
What are those values in arg1 to arg5 ?
arg1 is the hostgroup_id for write
arg2 is the hostgroup_id for read
arg3 is the number of writers we want active at the same time
arg4 represents if we want that the member acting for writes is also candidate for reads
arg5 is the log file
Because we only have 2 nodes in each group, we will not see the difference in mysql_servers table. If we use 3 nodes in each group, we will see the difference.
1
Admin> select * from mysql_servers;
It’s time to add some routing rules to be able to use those hostgroups. If you don only the first hostgroup will be used.
1
Admin> insert into mysql_query_rules (active, match_pattern, destination_hostgroup, apply) values (1,"^SELECT",2,1);
We will route all queries starting by select (this is not a recommendation of course a we will also send to hostgroup 2 all SELECT… FOR UPDATE, for example).
1
Admin> LOAD MYSQL QUERY RULES TO RUNTIME;
You can now save to disk the setup as it works as expected and it was easy and quick to setup:
1
2
Admin> save MYSQL SERVERS TO DISK; Admin> SAVE MYSQL QUERY RULES TO DISK;
9. Check and Test Everything
In ProxySQL node, make sure you can access group replication user and manage the database.
root@proxysqlnode:~# mysql -u sbuser -psbpassword -h 127.0.0.1 -P 6033 mysql: [Warning] Using a password on the command line interface can be insecure. Welcome to the MySQL monitor. Commands end with ; or \g. Your MySQL connection id is 366392 Server version: 5.5.30 (ProxySQL)
Copyright (c) 2000, 2017, Oracle and/or its affiliates. All rights reserved.
Oracle is a registered trademark of Oracle Corporation and/or its affiliates. Other names may be trademarks of their respective owners.
Type 'help;' or '\h'forhelp. Type '\c' to clear the current input statement.
SELECT * FROM playground.equipment; +----+-------+-------+--------+ | id | type | quant | color | +----+-------+-------+--------+ | 1 | slide | 2 | blue | | 2 | swing | 10 | yellow | | 9 | slide | 3 | green | +----+-------+-------+--------+ 3 rows inset (0.01 sec)
mysql> SELECT * FROM playground.equipment; +----+-------+-------+--------+ | id | type | quant | color | +----+-------+-------+--------+ | 1 | slide | 2 | blue | | 2 | swing | 10 | yellow | | 9 | slide | 3 | green | +----+-------+-------+--------+ 3 rows inset (0.01 sec)
mysql> SELECT * FROM playground.equipment; +----+-------+-------+--------+ | id | type | quant | color | +----+-------+-------+--------+ | 1 | slide | 2 | blue | | 2 | swing | 10 | yellow | | 9 | slide | 3 | green | | 15 | pen | 5 | purple | +----+-------+-------+--------+ 4 rows inset (0.00 sec)
mysql>
Make sure also you can access the user and manage the database trough internet. Use ProxySQL IP public to access it. For example the ProxySQL IP Public is 50.50.50.50. You can use this command on your mysql client in your computer: mysql -u sbuser -psbpassword -h 50.50.50.50 -P 6033
Setting environment for using XAMPP for Windows. user@DESKTOP-P20ELHV d:\xampp # mysql -u sbuser -psbpassword -h 50.50.50.50 -P 6033 Welcome to the MariaDB monitor. Commands end with ; or \g. Your MySQL connection id is 367836 Server version: 5.5.30 (ProxySQL)
Copyright (c) 2000, 2017, Oracle, MariaDB Corporation Ab and others.
Type 'help;' or '\h'forhelp. Type '\c' to clear the current input statement.
MySQL [(none)]> select * from playground.equipment; +----+-------+-------+--------+ | id | type | quant | color | +----+-------+-------+--------+ | 1 | slide | 2 | blue | | 2 | swing | 10 | yellow | | 9 | slide | 3 | green | | 15 | pen | 5 | purple | | 16 | watch | 6 | black | +----+-------+-------+--------+ 5 rows inset (0.06 sec)
Generate unique code by uuidgen command (only in node 1), copy the code and save it in somewhere. The code will be used for loose-group_replication_group_name in my.cnf
# Single or Multi-primary mode? Uncomment these two lines # for multi-primary mode, where any host can accept writes loose-group_replication_single_primary_mode = OFF loose-group_replication_enforce_update_everywhere_checks = ON
my.cnf file for node 2 will be similar with node 1. The difference is only in the #Host specific replication configuration section. So just replace that secton with this line below.
Do not forget to open up access in your external firewall if you have it. If you use the Alibaba cloud instance, you can open the port by following this tutorial https://www.alibabacloud.com/help/doc-detail/25475.htm
2. Configure Replication User and Enable Group Replication Plugin
Do it in node 1 and node 2
1
root@abcdefg:~# mysql -u root -p
Then you will be in mysql console
1 2 3 4 5 6 7 8 9 10 11 12 13 14 15 16 17
mysql> SET SQL_LOG_BIN=0; mysql> CREATE USER 'repl'@'%' IDENTIFIED BY 'password' REQUIRE SSL; mysql> GRANT REPLICATION SLAVE ON *.* TO 'repl'@'%'; mysql> FLUSH PRIVILEGES; mysql> SET SQL_LOG_BIN=1; mysql> CHANGE MASTER TO MASTER_USER='repl', MASTER_PASSWORD='password' FOR CHANNEL 'group_replication_recovery'; INSTALL PLUGIN group_replication SONAME 'group_replication.so'; mysql> SHOW PLUGINS; +----------------------------+----------+--------------------+----------------------+---------+ | Name | Status | Type | Library | License | +----------------------------+----------+--------------------+----------------------+---------+ | | | | | | | . . . | . . . | . . . | . . . | . . . | | | | | | | | group_replication | ACTIVE | GROUP REPLICATION | group_replication.so | GPL | +----------------------------+----------+--------------------+----------------------+---------+ 45 rows inset (0.00 sec)
3. Start Group Replication
In node 1:
1
2
3
mysql> SET GLOBAL group_replication_bootstrap_group=ON; mysql> START GROUP_REPLICATION; mysql> SET GLOBAL group_replication_bootstrap_group=OFF;
You only need to set ON and OFF for SET GLOBAL group_replication_bootstrap_group in one node only, and for another node you just do START GROUP_REPLICATION. Run this in node 2:
1
mysql> START GROUP_REPLICATION;
4. Check and Test Group Replication
To check group replication node is working, you just do this in one of node. Check MEMBER_STATE column if it is ONLINE or OFFLINE.
You can test to create a database, insert the data inside the table in one of the node. If it is working, the database will be replicated in another node. We configure the group replication as MASTER and MASTER so both of nodes can WRITE and READ. Do this in node 1.
1 2 3 4 5 6 7 8 9 10
mysql> CREATE DATABASE playground; mysql> CREATE TABLE playground.equipment ( id INT NOT NULL AUTO_INCREMENT, type VARCHAR(50), quant INT, color VARCHAR(25), PRIMARY KEY(id)); mysql> INSERT INTO playground.equipment (type, quant, color) VALUES ("slide", 2, "blue"); mysql> SELECT * FROM playground.equipment; +----+-------+-------+-------+ | id | type | quant | color | +----+-------+-------+-------+ | 1 | slide | 2 | blue | +----+-------+-------+-------+ 1 row inset (0.00 sec)
Check the data also in node 2.
1 2 3 4 5 6 7 8
mysql> SELECT * FROM playground.equipment; +----+-------+-------+-------+ | id | type | quant | color | +----+-------+-------+-------+ | 1 | slide | 2 | blue | +----+-------+-------+-------+ 1 row inset (0.00 sec) mysql> INSERT INTO playground.equipment (type, quant, color) VALUES ("swing", 10, "yellow");
You can check the data inside playground.equipment in node 1 and node 2. If it works fine, i will show like this bellow
1 2 3 4 5 6 7 8
mysql> SELECT * FROM playground.equipment; +----+-------+-------+--------+ | id | type | quant | color | +----+-------+-------+--------+ | 1 | slide | 2 | blue | | 2 | swing | 10 | yellow | +----+-------+-------+--------+ 2 row inset (0.00 sec)
Sometimes the APT reference from cloud provider does not complete although we already did apt-get update So we need to download MySQL debian package from the original source.
If you choose “set the password later” when you set up, you need to reset the password. Go to instance detail, insert the new password for root, restart the instance, then you can login using SSH.
To prevent message: “sudo: unable to resolve host [abcdefg]” once run sudo, you need to edit hosts file
1
root@abcdefg:~# sudo nano /etc/hosts
add the hostname to that file, like this line bellow
1
2
127.0.0.1 localhost 127.0.0.1 abcdefg
complete file example:
1 2 3 4 5 6 7
127.0.0.1       localhost
127.0.0.1       abcdefg
#The following lines are desirable for IPv6 capable hosts ::1 localhost ip6-localhost ip6-loopback ff02::1 ip6-allnodes ff02::2 ip6-allrouters